Wednesday, April 27, 2011

Chapter 13

Routed, Switched, Wireless and Troubleshooting Lab

This lab was almost identical to the lab we did in Chapter 7.  However, there was nothing really pre-setup for us like before.  Before our instructor had already consoled into the routers and setup their individual IP Addresses.  This time we were given the same equipment per group as before:  1 router, 1 switch, 1 serial cable.  The huge difference here is that we were to take only the standard IP Address, Subnet Mask, Blank Networking Diagram and written out instruction for Telneting into the routers and setting them up and work together as a team to complete physical setup, subnetting and RIP so all the computers could communicate with each other.
The physical setup was the same as before so we all flew through that.  Then the filling out of the Network Diagram came and things slowed down a good bit.  After much coordinating we all came together and filled in the information to give us the completed Diagram:


From here each group took the IP Address information and proceeded to setup up their routers.  The first set of instructions was the commands to setup the Serial 1, Serial 0, Ethernet 0 and Clock rate connections so the computers could ping through to the other routers that were directly connected to your router:


Once these instructions were followed we did a Show Run command in our Telnet prompt to check the setup and make sure everything was configured correctly:


After checking the settings again via the Telnet command screen and check to see if we were able to ping the directly attached routers we used the second set of instructions to configure RIP so we could ping throughout the entire network we had built:


When we had all finished following these instructions we tested the network to see if the RIP took by pinging other routers and computers that were not directly attached to our router:


Unfortunately we ran out of time at this point and even though we had succeeded thus far, we were unable to continue and add in the wireless portion of the network.  Even though the class couldn’t fully complete the lab because of time restraints, we all did an excellent job in building a routed and switched network without the aid of our instructor.

Chapter 12

Secure a Wireless Access Point and Personal Firewall
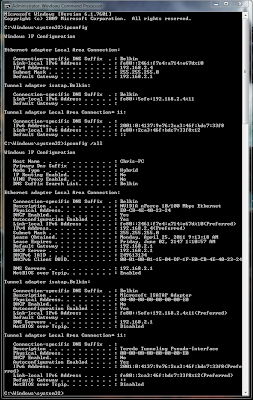
This was a very straight forward lab.  First thing I did was open a command prompt so I could do an ipconfig command and get my default gateway information:


Once this was completed I took the default gateway and entered it into my web browser which brought up the GUI for the routers controls:


Here I made sure to set the wifi password and I used WPA/WPA2 security as it’s the best available through this D-Link router.
From here it was time to check my Firewall and make sure it was turned on.  I opened up the control panel and selected the Security Center.  I then selected the Windows Firewall and ensured that it was fully turned on:


While I was only using the Windows Firewall, you should be aware that there are many other Third Party Firewalls available.  The Windows Firewall from Windows Vista and newer OS’s is actually pretty decent, but it is also one of the most common so it will be one of the most attacked for weak spots.  Getting a different Firewall is totally optional but, in my personal opinion, worth doing.

Chapter 11

CCC Network Tour
We started in the Wayne West building for the Colleges Network Tour.  Here there are several switches and a router setup to send the traffic to and from each room as well as each floor where there is a similar setup.


Each floor has large pipes that allow the CAT-5 cables to run out to each room and connect to the jacks in the rooms.  It also has a fiber optic cable that runs from each floor to the next to connect the floors and complete the whole connection.


From here there are underground cables that run from the Wayne West Building over to the Library’s first floor.  At the end of the hallway on the first floor of the Library is where the IT and Server area for the school is located.  This area houses all the servers, SANs, NASs and consoles that run the schools network.

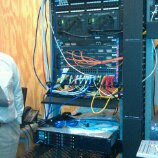
The consoles are how the IT personnel access, update and control all the servers and various other equipment in for the Carteret Community College Network.


These pictures hardly do the whole network any justice, but it is a very unique sight to see.  Most people only see the network from their PC and have no idea as to what it really takes to run it and keep it running.  It really is true when you hear IT people say that a networker is never off of work because it is truly a 24 hour a day 7 day a week job.

Chapter 9

Virtual Operating System Lab
Virtualization has become a very big part of most networks today.  The shear possibilities it opens up coupled with the ease of snap shot backups makes it an almost must have.
For this lab we downloaded and installed Virtual PC 7, a freeware program, that allows you to virtually run another operating system on your computer while the main operating system is still running.
The goal here was to install Damn Small Linux, or DSL, into the Virtual PC 7 console and then access the internet via the virtual DSL operating system.  Try as I might, I was not able to get DSL to install and boot up to a working configuration.  After several Google searches and many pages of reading for a solution later, I was told to go ahead and try another operating system or two.
I tried three other OS’s, Ubuntu, Peppermint One and Lucid Puppy.  Ubuntu and Peppermint One ended with the same fate as DSL.  Lucid Puppy was a full on success though.


Once I got Lucid Puppy up and running I had a little bit of a quirky time getting the internet up and running because it uses its own style of web browser.  A few minutes of playing around and I was off and running on the web.

Chapter 8

WLANs Project

Keebox W150NR  Price:  $24.99
The Keebox W150NR wireless router is a pretty basic wireless router.  It does cover all three of the normal bands, B, G and N and it has four ports for wired connections as well.  While it is an N router, it has a smaller range and is designed for more of a small home office type of setup.
This router is very affordable with a less the $25 dollar price tag on it.  It can be purchased from various internet websites.  This would be a great starter wifi router for anyone looking for a basic setup.

Edimax BR-6574n  Price:  $59.99
The Edimax BR-6574n wireless router is a more advanced router then the Keebox one listed above.  This router covers all the basics like the Keebox, but has a further range and faster speeds available.  While it also only has 4 wired ports, those ports are at Gigabit speed as is the wireless connection it provides.
The security is standard with the option of WEP or WPA/WPA2 and the ability to password protect the router itself.  It comes in at more than double the price of the Keebox but you get faster speeds and farther range with it.  This is a great router for gamers and for people that have a need for their wifi to span their entire house.

Cisco WRVS4400N  Price:  $209.99
Businesses tend to require more out of their wifi then home owners and because of this companies like Cisco make wireless routers like the WRVS4400N.  This router is designed for small to medium sized businesses.  It’s capable of supporting VoIP, VPNs and large data transfer at faster speeds.  While it also comes with four wired ports, it’s ports are setup for 10/100/1000 Gigabit speeds along with the wireless.
Security in business is a must and the WRVS4400N is no slacker with it.  In addition to the WEP and WPA/WPA2 standards it also comes equipped with an Intrusion Prevention System (IPS) and an advanced firewall that allows for full customization of your port security.  This is definitely not a beginner or gamer wifi device as the $200 price tag and advanced security features plainly show.


Build a Wireless Network Lab
The first thing you need to make a wireless network is a wireless access point/router.  We used the D-Link wifi routers that we’ve used in prior labs because we have them and they’re actually pretty good routers.


The first thing you do is connect your wireless router to your internet connection (i.e. your modem but in our case, in the lab, the floor jack).  From there you should connect your computer to one of the available ports on the back of the router via a CAT-5 cable.  While this is a wireless network, and we will be doing wireless, the best way to configure your access point/router is via a wired connection.
Once you are all setup you need to bring up a command prompt and do an ipconfig command like this:


This will allow you to get your default gateway IP Address and enter it into a web browser.  By doing this it will open up your menu for your router so you can configure it like this:


From this GUI web interface we setup our security, WEP or WPA/WPA2, as well as changed the default blank password on the router itself to something different so no one could connect to our router and change everything. 
Once this is all done we disconnect our CAT-5 from our computer to the router and installed the software and hardware for the wireless doggle that will allow us to wirelessly connect to the router:


Once this was done all we did was follow the onscreen instructions, entered our password that we setup for our wireless network and we were online and ready to go via our wireless network we setup.

Chapter 7

Build a Routed Network Lab
This was one of the best hands on labs that we did.  The whole setup was very interesting and a great learning experience.  We broke the room into 5 two to three person groups.  Each group was given a router, a switch and a serial cable.
The group’s computers were then hooked via their CAT-5 cables into the switch and the switch was hooked into the router.  Each router was connected to two other routers via the serial cables (unless you were an end point then you were only hooked up to one other router) to form a kind of daisy chain connection.  The basic setup at each group looked something like this:


Only with large blue serial cables attached to the two serial ports in the back of the router (unless like I said earlier you were an end point).
Once the physical setup was completed we were given some basic information, as the instructor had already configured the routers IP Addresses, and asked to figure out our subnets for the computers that were connected to our switches.
From there we used a program called Putty to Telnet into our routers instead of consoling in via cable to the Cisco IOS.


This allowed us to setup and make changes to the router so it would understand what router was talking to it and on what serial port it was talking on.  We were also able to setup the clockrate and change IP Addresses if we wanted to. 
Once all the internal setup was completed we attempted to ping other computers and were able to ping our own but not others on the network.  After some trouble shooting our instructor realized that we were using class C private IP Addresses and so some changes were made and we instituted RIP on the routers and it made it so we were able to ping through the network.

Chapter 6

Build a Switch Network Lab
We used two switches for this lab and split the room in half with one switch per half of the room.  Everyone on the right half of the room hooked their computers into their switch, while everyone on the left half of the room hooked their computers into the switch that was assigned to them.


Once all the computers were hooked up to the switches we connected the switches with a crossover cable.  The crossover cable allowed the switches to communicate with each other so in turn all the computers could then talk to each other.
Once all the physical setup was done we then were given an IP Address and a Subnet for it and we had to use that information to break everything down and assign each person a static IP Address.


Once all of the static IP Addresses were assigned we brought up a command prompt and started pinging people both on our side of the room as well as on the other side.  While some of the pings were instant and hand no trouble going through, others were failing at first because not everyone had their IP Addresses and Subnet Masks configured correctly as well as some people left their firewalls on so it was blocking all the ports and not allowing any pings to go through.


Cisco Switches Project

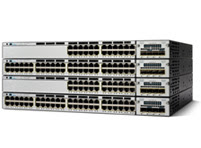
Cisco Catalyst 3750-X Series
The Cisco Catalyst 3750-X series is a good access level switch that can enhance productivity through enabling many applications.  These applications include IP telephony, wireless and video.  This can allow for a borderless network experience.  This switch is also stackable and highly scalable allowing for growth in your network where and when needed.  They range in price from $3,100 up to $6,298 depending on the model from the series you want and the distributor that you buy them from.

Cisco Catalyst 6500 Series
This distribution level switch series has several new innovations that have been implemented to them.  They include things such as borderless integrated service modules, the Cisco IOS Software Release 12 2(33)SXI4, a borderless services Node and with the right model the ability to have 2 terabyte switching.  They have an increased uptime because they support modular Cisco IOS software which allows for better planned and easier covered unplanned downtimes.  They are also pretty secure because they use an Adaptive Security Service Module that allows them to take full advantage of the current security structure your network is using and this allows them to increase VPN session counts and provides for more efficient power use on a single blade.  They range in price from $2750.20 to over $20,000 depending on the model, modules, frame size and depending on the distributor.

Cisco Nexus 7000 Series
This core level switch is set in a modular design that will allow you to build your network the way you want it.  Because of this modular design it allows for you to deliver up to 10 Gigabit Ethernet and unified fabric setup.  This will allow for some of the fastest and most reliable speeds available for data transfer in a network.  It’s single end to end platform allows for an end to end solution to core, aggregation  and high density end of row and top of rack server connectivity in one single platform.  The overall design allows for excellent scalability and transport flexibility.  This series of switches average in price around $15,665.82 but could be more or less depending on the options you choose, model in the series and distributor purchased from.